
Download the latest version of Praat from www.praat.org. Choose your operating system, download the file and extract it. There is only one file (praat.exe) and it works straight away without any installation.
In addition, you will need to install phonetic fonts (on the same webpage as the programme), if you have not installed them for the Transcription Assignment already.
Upon running Praat, two windows open: the Objects window and the Picture window. You can close the Picture window since you won’t need it.
You can open any (compatible) files by pressing Ctrl-O. Open your recording (.wav file) – a new Sound object is loaded into the Object window with the name of your file. In Windows, you can also drag files onto the Praat icon to open them.
Here is a zip file with a Sound and TextGrid for the practice lesson.
Because we want to describe what happens in your recording, an object that encodes such information (we call it a TextGrid, or TG) must be created. It consists of “tiers” where you can store any text you want. You can also divide the tiers into “intervals” (like a sentence into words). This is very convenient because you can describe the recording at different levels and in different places.
If you need to create a new TextGrid, select your sound (if not selected) and a dynamic menu will appear on the right. Click Annotate – To TextGrid…. and fill in the information. In the „All tier names“ box, enter e.g. „phrase“, which will later create a TG with just one tier called “phrase”. If you want more tiers, put in more names separated by a space. The second box should be left empty. Click OK and a TextGrid object will appear along with the Sound in the Objects window.
For editing, select both the Sound and the TextGrid (you can use the Ctrl or Shift button) and click Edit in the dynamic menu on the right. A new window opens (the Editor window, in which you will be working from now on) with the tiers that we created (e.g. „phrase“). First, save the TextGrid by pressing Ctrl-S. In future sessions, you will open both the Sound and the TextGrid together from your hard drive using Ctrl-O in the Objects window.
Praat does not save automatically. Remember to save your TG before closing Praat! Otherwise all your work will be lost.
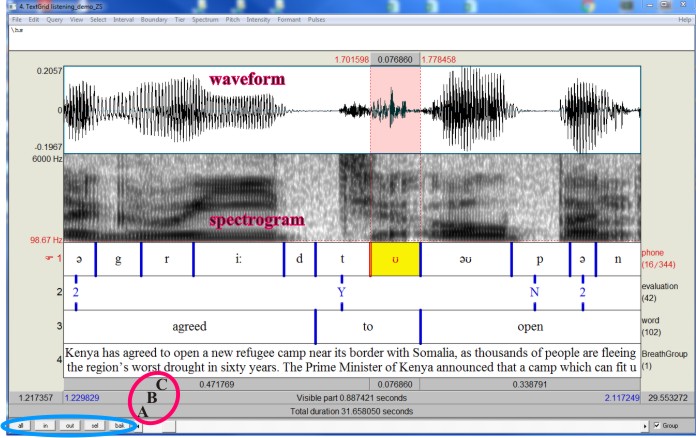
When you open the Sound and TextGrid, a new window will appear. The top panel shows the waveform, the second panel shows what is called the spectrogram. (The spectrogram displays changes of sound quality over time.) Below the spectrogram, you will find four text tiers as an example. We distinguish between interval tiers (phone, word in the picture) and point tiers (evaluation).
Below the tiers, you can see three „bars“ (circled red). These bars are used for playing the sound: by clicking the bar indicated A, you will play the entire sound file, bar B plays the portion currently visible in the window, and bar C plays the portion delimited by the cursor (before it, a selection as shown here, or after it). You can stop playing by pressing Escape at any time.
You can zoom in and out using the buttons in the bottom left corner (circled blue): all shows the entire sound, sel zooms in to the current selection, bak goes one step back.
You have several options how to enter a new boundary in an interval tier. First, after putting your cursor to the place you want, press Ctrl+F1 (or Ctrl+1, but not on the numerical keyboard) – this will add a boundary to the first tier. This works analogically for the other tiers, just change the number. Second, you may use the menu Boundary. Third, you can click into the little circle which appears when you click in the signal, and a new boundary will be added at the place of the cursor.
Moving boundaries is also easy. Just grab it with your mouse and move it. If you want to move boundaries which are at the same place in time but in different tiers (e.g. the phone and word boundary at the same time), move one of them while holding left Shift – they will move both.
You can delete a boundary by pressing left Alt + Backspace, or choose the appropriate command from the Boundary menu.
A point tier only has “points”, but we work with them in the same way as with interval boundaries (creating, moving, deleting). Text is thus associated with the point itself, not with the interval space. You will use point tiers for all your evaluations.
In order to insert a point tier in the Editor window, click Tier – Add point tier…. You can add interval tiers in the same way, just choose Add interval tier… instead. In both cases you must specify the position of the new tier (e.g. 2 = it will be a second tier from top) and put a name to it.