
The usage of ultrasound tongue imaging (UTI) in second language (L2) speech sound remediation and learning has gained a significant amount of interest in recent years (Bliss, Abel & Gick, (2018); Kocjančič Antolík, 2020).
UTI is a safe, non-invasive, and user-friendly method of visualizing tongue in real-time while speaking (Stone, 2005). It captures a midsagittal or coronal view of the tongue and allows visualizing the tongue shape, position, and movement.
An ultrasound probe, placed under the speaker’s chin, emits high-frequency sound waves that travel straight upwards from the probe through the chin and tongue tissue. At a boundary of two media with different density, the waves are reflected and travel back to the probe. Based on the time spent between the emission and the reception of the wave, and the information about the density of human tissue, the point of reflection is calculated and marked on an image as a bright point. In the case of tongue imaging, the reflection boundary is represented by the tongue surface and air above it or the tongue surface and bone, when the tongue touches the hard palate. Importantly, when the tongue tip is raised, an air pocket is created bellow it and the emitted ultrasound waves get reflected at the boundary of chin tissue and this air pocket, and cannot reach the tongue tip. For this reason, UTI cannot be used to reliably determine the exact tongue tip in the created images.
UTI allows observing tongue surface in two views: midsagittal and coronal. The view is changed simply by turning the probe by 90˚. In both views, the resulting images show a bright curve and the lower edge of this curve represents the tongue surface.
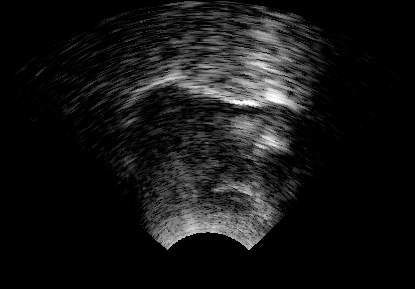
Midsagittal view (on the left in Figure 1) shows the tongue as viewed from the side of the head. The white curve in the image corresponds to the tongue surface from the front (on the right side of the image) to the back (on the left side of the image) of the oral cavity.
The coronal view (on the right in Figure 1) shows the tongue as viewed from the front of the head. The white curve corresponds to the tongue surface from one side of the tongue to the other.
 |
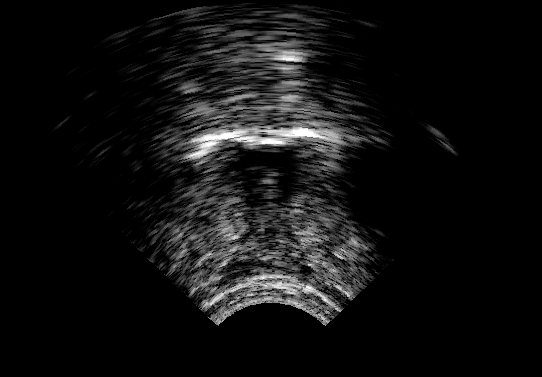 |
Figure 1. Ultrasound images of the tongue. Left image: midsagittal view with the front of the tongue on the right side of the image. Right image: coronal view.
As seen in Figure 1, UTI images only tongue surface and no other structures in the oral cavity. The midsagittal image is typically limited by the shadows created by the jaw and the hyoid bones, while the coronal image is limited by the jaw bone only. The images also contain various gray-scaled areas representing less prominent points of ultrasound wave reflections due to tissue structure (such as muscles, fat cells).
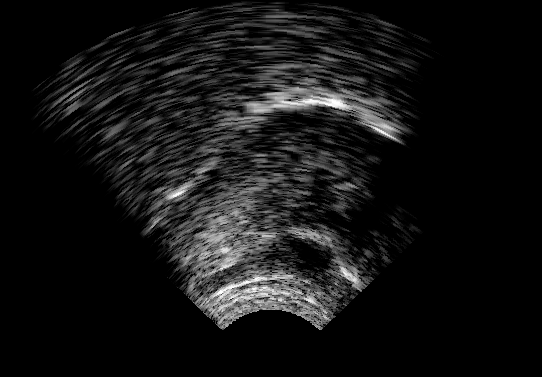
However, UTI makes it possible to view the hard palate. To image the hard palate, the speaker is asked to take a sip of water and hold it in the mouth before swallowing it. Because the water has a similar density to the human tissue, the ultrasound waves emitted from the probe do not get reflected at the tongue surface-water boundary but only at the water-hard palate boundary. The obtained hard palate outline can then be superimposed on a real-time image to give partial information about the roof of the oral cavity.
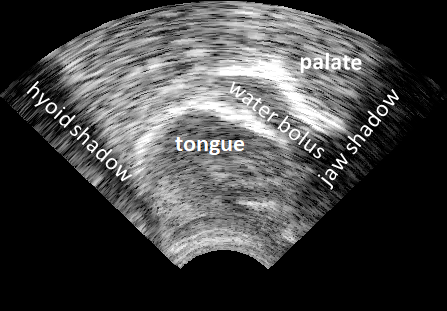 |
Figure 2. Midsagittal ultrasound image of the tongue, palate, and water bolus. Jaw and hyoid shadows limit the view on the right and left side of the image, respectively. The front part of the tongue is on the right side of the image.
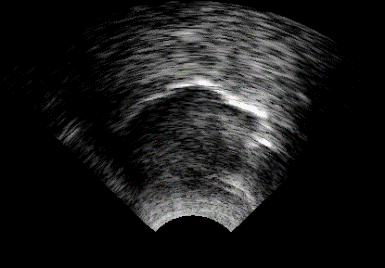
UTI allows observing even small differences in the shape of the tongue. Furthermore, because the tongue does not behave as a single articulator, the method allows observing this differences in the front, middle and back part of the tongue (Figure 3), as well as in either of the tongue sides and the midline (Figure 4).
 |
 |
Figure 3. Midsagittal images of the tongue with the front part of the tongue on the right side of the image. Left image: the back of the tongue lowered, the middle part of the tongue lowered, front of the tongue raised. Right image: the back of the tongue raised, middle and front part lowered.
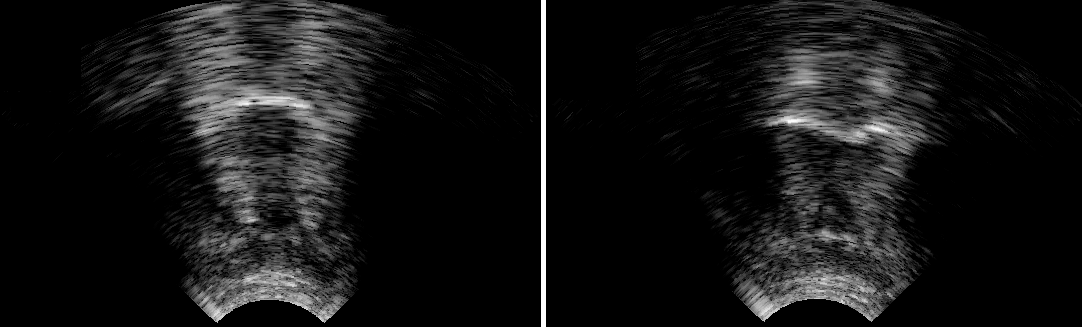 |
Figure 4. Coronal images of the tongue. Left image: both sides of the tongue lowered. Right image: both sides of the tongue raised with visible midline grove.
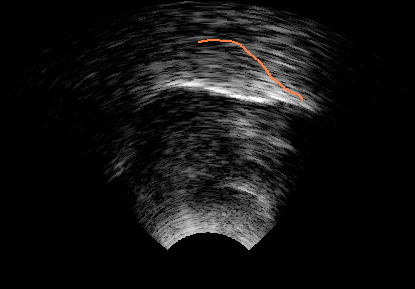
The position of the tongue in the oral cavity is less straightforward to define. Because no other structures of the oral cavity are directly visible on an image, the tongue position cannot be described in relation to them. However, the position of the tongue can be described either by its relation to the superimposed hard palate outline (Figure 5) or by the relationship between two tongue positions (Figure 6). Figure 5 allows describing the position of the tongue relative to the hard palate. In the left image, the front of the tongue is close to the palate/alveolar ridge, while on the right image, the font of the tongue is lower but the middle and back parts of the tongue are closer to the palate. Figure 6 demonstrates the relationship between two tongue images by plotting the extracted tongue contours together. Such a presentation makes it easier to compare the shape and position of two tongue contours relative to each other.
Importantly, to apply any of these techniques, the probe has to be kept in the same position when obtaining the hard palate image and the tongue images used for comparison. Because the probe emits the ultrasound waves straight upwards, it always scans only a section of the tongue that is straight above the probe. This means that if the probe location or its angle at which it’s placed against the chin changes, the section of the tongue that is straight above it changes as well. UTI does not scan the same part of the tongue and the resulting images cannot be directly compared to each other. The best method for obtaining the scan of the same part of the tongue is to use a special headset that fixes the probe under the chin and prevents its movement. Alternatively, and only suitable for short periods of time, the speaker can be asked to hold the probe still while speaking. This method was used in our experiments during the UTI practice and we have not noted any downsides to it.
 |
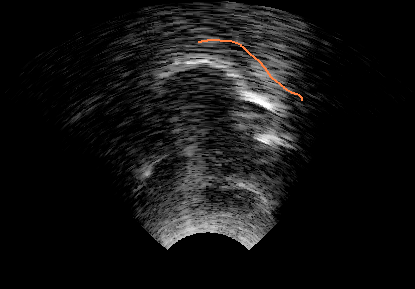 |
Figure 5. Midsagittal tongue images with superimposed hard palate trace (in orange). The front of the tongue is on the right side of the image.
 |
 |
 |
Figure 6. Left: midsagittal tongue image of /u/. Middle: midsagittal tongue image of /a/. Right: extracted traced tongue contours for /u/ (in green) and /a/ (blue) allow direct comparisons of the tongue contours shape and position relative to each other.
Real-time UTI is an ideal method for observing tongue movements. Video 1 shows a learner saying “can”, on left, and “tan”, on the right.
Video 1. Midsagittal ultrasound video showing tongue movement during the production of “can” (on the left) and “tan” (on the right).
Because learners can observe their tongue, and the teacher’s tongue, in real-time when producing L2 speech sounds, the method allows them to, first, notice the difference between their own articulation and a standard one (as modeled by the teacher). Second, it makes it easier to understand what kind of movements have to be acquired to achieve the correct tongue shape and position. Third, the learners can improve control of tongue movements by utilizing visual feedback.
UTI furthermore more globally increases the awareness of tongue movements, which can potentially have a positive effect on future non-UTI pronunciation training. Importantly, UTI allows the learners to produce an L2 speech sound correctly early in the training, even within the first five minutes of practice. Successful production makes the learner realize that he or she can produce even difficult L2 sounds and have a great motivational effect on training.
In the UTILE project, we used a Micro system with Articulate Assistant Advanced software (Articulate Instruments Ltd, 2012) by Articulate Instruments [ http://www.articulateinstruments.com/ultrasound-imaging/?target=Echo%20B ]. Figure 7 shows a screen view during pronunciation training.
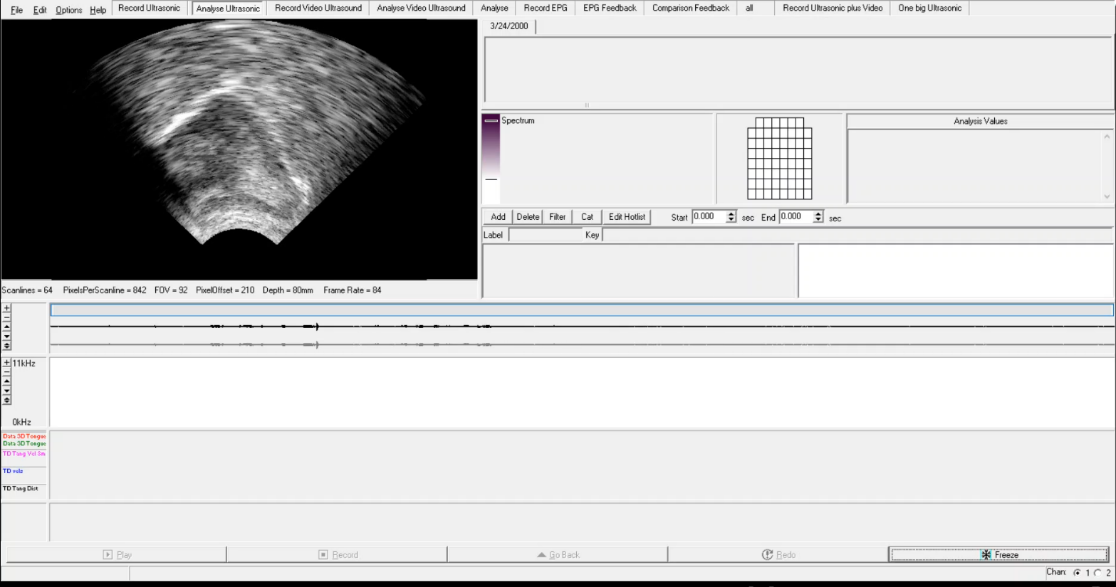 |
Figure 7: Screen view during the pronunciation training using Articulate Assistant Advanced.
We are aware of two commercial ultrasound systems aimed at clinical practice: Sonospeech by Articulate Instruments and Speech Language Pathology set by SeeMore. However, almost any kind of medical ultrasound system with an appropriate probe can be used for tongue imaging (for more information of suitable probes see Lee at al., 2015).
During the training with UTI, it is useful to be able to mark the target tongue shape or position, target location in the oral cavity, and/or palate. If the ultrasound software does not allow such annotations of the real-time images it is useful to overlay the screen with transparency and draw the annotation directly on it.
To carry out UTI, it is also necessary to use ultrasound gel, disinfecting wipes for the probe, and wipes for removing the gel from the speaker’s chin.
In the UTILE project we tested two methods of delivering pronunciation training: individual and classroom.
Individual pronunciation training has been a preferred method in the UTI L2 application (Gick et al., 2008; Sisinni et al., 2016; Kocjančič Antolík, Pillot-Loiseau & Kamiyama, 2019). In our experiment, the learners received three 45-minute long sessions delivered approximately one week apart (Kocjančič Antolík & Volín, 2019).
Pros: Individual practice allows a sole focus on the learner, offers a chance to produce many repetitions of the target movement(s), makes it possible to adapt the training based on the ongoing success, allows the opportunity to explain, discuss and analyze the performed and target movements.
Cons: Time-consuming both for the learner and trainer, high level of attention needed to control the tongue can result in fatigue of the learner.
Classroom UTI pronunciation training has been less researched (Kühnert & Kocjančič Antolík, 2017). In our experiment, the learners participated in one or two sessions delivered during their regular 90-minute class on L2 pronunciation (Kocjančič Antolík, Bořil & Hofmann). During each session, the learners received about 7 minutes of individual training and each learner selected one to four speech sounds they wanted to practice. Additionally, they were asked to actively participate in the individual sessions of their classmates. They were all observing tongue movements of each classmate, comparing the movements to the output, and trying to (silently) make the target movements themselves.
Pros: The most important advantage of this method is that several learners can use UTI during one class and benefit not only from their own training but from the training of classmates as well. The training is still delivered individually to each learner. Training target(s) can be selected for each learner separately or all learners practice the same.
Cons: Less time to focus on the individual learner, as well as to explain and discuss the productions and targets, and a smaller amount of repetitions during the practice.
The main difference between traditional methods of teaching L2 speech sounds and UTI is that the initial focus of the training is not solely on the auditory perception of the produced sound but on tongue movements needed to produce the sound. The goal of the pronunciation training is that the learner acquires the necessary tongue movements for the correct production of the L2 sounds, with the ultimate goal of automatizing the production and using the newly acquired sounds in spontaneous speech. Because acquiring tongue movements is the central part of the pronunciation training, the training needs to be based on motor learning. Cleland et al. (2018) have summarized the principles of motor learning when using UTI as visual feedback in speech therapy. The same principles should be followed when using UTI as visual feedback in L2 speech sound learning or remediation.
The motor learning process is divided into two parts: pre-practice, focused on the acquisition of the new movement, and practice, focused on the automatization of the movement.
In the pre-practice part, the learner needs a high dose of training at least once per week. The training has to be organized in blocks consisting of the same target in its simplest form (e.g. speech sound in isolation). The attention focus of the learner has to be external (how the produced item sounds) and internal (what kind of tongue movements were made). The feedback has to be given frequently, immediately after the production attempt, and with a short delay and should give information about the realization of the tongue movement and the correctness of the resulting sound.
A high dose of training at least once per week is required also in the practice part of the motor learning process. However, the training can be organized in random blocks of different and more complex items with external attentional focus. The feedback about the correctness of the produced sound is given less frequently and only after a short delay. The judgment on the correctness should be passed to the learner.
In the UTILE experiments, we focused on the practical application of using UTI in L2 speech sound learning and remediation. Because of the practical component, linked mainly to time constraints, the pronunciation training was focused mainly on the acquisition of new tongue movements.
Video 2 shows an example of pronunciation training with UTI. The goal for the learner was to improve the production of vowel /u:/. The video first shows the learner’s production of the vowel /u:/ before and after receiving instructions on tongue position. Successful trials are followed by practicing the vowel preceded or followed by consonants /k/ and /t/. Finally, the learner produces the vowel /u:/ in isolation with minimal effort. Importantly, the whole training session lasted about seven minutes, during which the learner practiced three different vowels.
Video 2. Example of UTI training. The front of the tongue is on the left side of the image.
Overall, the learners reported the following:
Articulate Instruments Ltd. (2012). Articulate Assistant Advanced User Guide: Version 2.14. Edinburgh, UK: Articulate Instruments Ltd.
Bliss, H., Abel, J. & Gick, B. (2018). Computer-assisted visual articulation feedback in L2 pronunciation instruction: a review. Journal of Second Language Pronunciation 4, 129-153.
Cleland, J., Wrench, A., Lloyd, S. & Sugden, E. (2018). ULTRAX2020: Ultrasound technology for optimising the treatment of speech disorders: Clinicians’ resource manual.
Gick, B., Berhardt, B., Bacsfalvi, P., Wilson, I. 2008. Ultrasound imaging applications in second language acquisition. In: Hansen Edwards, J.G., Zampini, M.L. (eds.), Phonology and second language acquisition. Amsterdam: John Benjamins, (pp. 309–322).
Kocjančič Antolík, T. (2020). Ultrasound Tongue Imaging in Second Language Learning. Studie z aplikované lingvistiky, 2020, 1, 109-116.
Kocjančič Antolík, T. & Volín, J. (2019). Ultrasound tongue imaging for vowel remediation in Czech English. In Sasha Calhoun, Paola Escudero, Marija Tabain & Paul Warren (eds.) Proceedings of the 19th International Congress of Phonetic Sciences, Melbourne, Australia 2019 (pp. 3651-3655). Canberra, Australia: ASSTA Inc.
Kocjančič Antolík, T., Bořil, T. & Hofmann, S. (in review). Acoustic and articulatory visual feedback in classroom L2 vowel remediation. Language Learning & Technology.
Kocjančič Antolík, T., Pillot-Loiseau, C. & Kamiyama, T. (2019). The effectiveness of real-time ultrasound visual feedback on tongue movements in L2 pronunciation training: Japanese learners improving the French vowel contrast /y/-/u/. Journal of Second Language Pronunciation, 5, 72-97.
Kühnert, B. & Kocjančič Antolík, T. (2017). Exploring the use of ultrasound visual feedback in the classroom: a pilot study on the acquisition of selected English vowel contrasts by French learners. 5th International Conference on English Pronunciation: Issues & Practices. Caen, France.
Sisinni, B., d’Apolito, S., Fivela, B. G. & Grimaldi, M. (2016). Ultrasound articulatory training for teaching pronunciation of L2 vowels. ICT for language learning, 265–270.
Stone, M. (2005). A guide to analysing tongue motion from ultrasound images. Clinical linguistics & phonetics, 19(6-7), 455-501.